إعـــــــلان

Collapse

.

,
See more
See less

سيراتو 2011 جديده كليا و شوية تعديلات خارقه بالصور

Collapse
X
 
  • Filter
  • الوقت
  • Show
Clear All
new posts


  • This image has been resized. Click this bar to view the full image.


    This image has been resized. Click this bar to view the full image.


    This image has been resized. Click this bar to view the full image.
    [COLOR="Navy"][SIZE="6"]إنا لله وإنا إليه راجعون
    ولا تحسبن الذين قتلوا في سبيل الله أمواتا بل أحياء عند ربهم يرزقون [/SIZE][/COLOR]

    Comment


    • تركيب زينون


      This image has been resized. Click this bar to view the full image.


      Test fitting all the connections and plugged everything in the car.

      This image has been resized. Click this bar to view the full image.


      I used a 1” hole saw and made a hole onto the cover as shown

      This image has been resized. Click this bar to view the full image.


      I ran the wires through and used black caulking on the grommet to help seal the grommet once in-place

      This image has been resized. Click this bar to view the full image.


      This image has been resized. Click this bar to view the full image.


      I added a few strips of double sided tape and adhered the ballasts to the top of the windshield washer reservoir and the body as shown.

      This image has been resized. Click this bar to view the full image.


      This image has been resized. Click this bar to view the full image.


      This image has been resized. Click this bar to view the full image.


      This image has been resized. Click this bar to view the full image.


      The lighting is incredible. The cut-off is actually quite low for a headlamp assembly that’s not designed for HID lighting output.

      This image has been resized. Click this bar to view the full image.
      [COLOR="Navy"][SIZE="6"]إنا لله وإنا إليه راجعون
      ولا تحسبن الذين قتلوا في سبيل الله أمواتا بل أحياء عند ربهم يرزقون [/SIZE][/COLOR]

      Comment


      • تركيب كلكس قوى

        Hella Supertone horn set install

        After driving the Koup for a week, I found that it was necessary to this little car a louder bark. There are too many driver’s that obviously forgot or don’t care looking before changing lanes.
        Youtube was a great source when it came to being able to listen to a variety of aftermarket horns.
        I liked the Hella Supertone’s the best so I was on a quest to find them locally which I did.
        I purchased them from a cool place called NextMod ( www.nextmod.com ).
        The owner Peter is a great guy.
        Just a word of caution, you can get carried away in his shop with all the available goodies....don’t say I didn’t warn you!


        Before video: original single horn


        After video: Hella Supertone’s behind bumper


        Instructions: I used the 2b wiring diagram with the relay. Some say it isn’t necessary to hook up the relay, but I did anyways to be safe. I also used a 20amp fuse.

        This image has been resized. Click this bar to view the full image.


        Here are some installation pictures;

        Begin by using some low-tack painters tape around the headlamp assembly to avoid any potential damage due to the headlamp removal.

        This image has been resized. Click this bar to view the full image.


        This image has been resized. Click this bar to view the full image.


        remove this little puppy!

        This image has been resized. Click this bar to view the full image.


        I found this to be a suitable location which is just inboard of the fog lamps and away from any direct water impact that would potentially reduce the life of the production finish

        This image has been resized. Click this bar to view the full image.


        This image has been resized. Click this bar to view the full image.


        I drilled a hole that will accept an M6 collapsible riv nut

        This image has been resized. Click this bar to view the full image.


        M6 collapsible Riv nut installed

        This image has been resized. Click this bar to view the full image.


        horn mounted

        This image has been resized. Click this bar to view the full image.


        both horns mounted

        This image has been resized. Click this bar to view the full image.


        I ran the original connector back through the opening and tied it just under the headlamp area

        This image has been resized. Click this bar to view the full image.


        This image has been resized. Click this bar to view the full image.


        these are some pictures of pre-wiring and checking for proper function before I add in all the connectors and wire loom

        This image has been resized. Click this bar to view the full image.


        This image has been resized. Click this bar to view the full image.


        This image has been resized. Click this bar to view the full image.


        here is everything all connected along with all the wires in a wire loom

        This image has been resized. Click this bar to view the full image.


        Click this bar to view the full image.


        This image has been resized. Click this bar to view the full image.


        Click this bar to view the full image.


        I used a lot of cable tied in case you haven’t noticed yet. The wires are running along the top of the radiator support for the right side of the car and back down.

        This image has been resized. Click this bar to view the full image.


        This image has been resized. Click this bar to view the full image.


        Click this bar to view the full image.


        Click this bar to view the full image.


        Part details:
        Hella Supertone Horn Set
        2x 66W
        500 Hz (high tone)
        300 Hz (low tone)
        118dB (A)
        Relay included
        3AG 003 399-801 (12V)
        [COLOR="Navy"][SIZE="6"]إنا لله وإنا إليه راجعون
        ولا تحسبن الذين قتلوا في سبيل الله أمواتا بل أحياء عند ربهم يرزقون [/SIZE][/COLOR]

        Comment


        • زراع تثبيت ,فايدته زيادة ثبات السياره فى الملفات بصوره ملحوظه و قويه\


          This image has been resized. Click this bar to view the full image.


          This image has been resized. Click this bar to view the full image.
          [COLOR="Navy"][SIZE="6"]إنا لله وإنا إليه راجعون
          ولا تحسبن الذين قتلوا في سبيل الله أمواتا بل أحياء عند ربهم يرزقون [/SIZE][/COLOR]

          Comment


          • التفييم


            This image has been resized. Click this bar to view the full image.


            This image has been resized. Click this bar to view the full image.


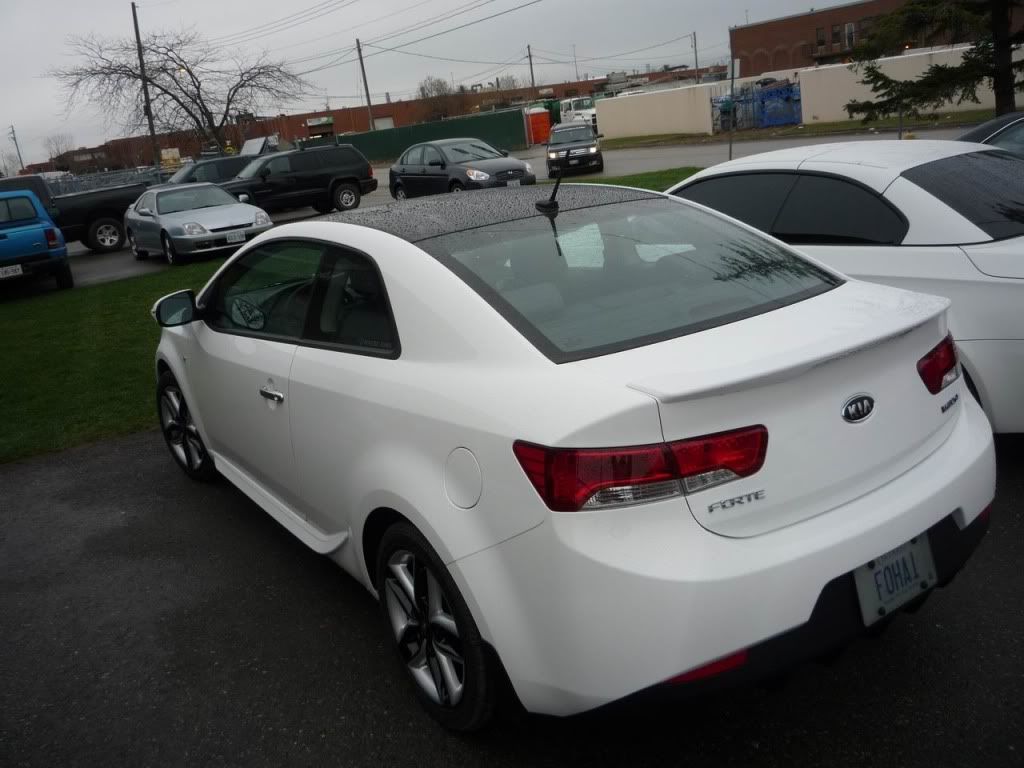
            After with 35% tint applied by Pablo

            This image has been resized. Click this bar to view the full image.


            This image has been resized. Click this bar to view the full image.
            [COLOR="Navy"][SIZE="6"]إنا لله وإنا إليه راجعون
            ولا تحسبن الذين قتلوا في سبيل الله أمواتا بل أحياء عند ربهم يرزقون [/SIZE][/COLOR]

            Comment


            • التهبيط و التسقيط


              Before – Front

              This image has been resized. Click this bar to view the full image.


              After – Front

              This image has been resized. Click this bar to view the full image.


              Before – Side

              This image has been resized. Click this bar to view the full image.


              After – Side

              This image has been resized. Click this bar to view the full image.


              Before – Rear

              This image has been resized. Click this bar to view the full image.


              After – Rear

              This image has been resized. Click this bar to view the full image.


              This image has been resized. Click this bar to view the full image.


              This image has been resized. Click this bar to view the full image.


              This image has been resized. Click this bar to view the full image.


              This image has been resized. Click this bar to view the full image.


              This image has been resized. Click this bar to view the full image.
              [COLOR="Navy"][SIZE="6"]إنا لله وإنا إليه راجعون
              ولا تحسبن الذين قتلوا في سبيل الله أمواتا بل أحياء عند ربهم يرزقون [/SIZE][/COLOR]

              Comment


              • This image has been resized. Click this bar to view the full image.
                This image has been resized. Click this bar to view the full image.
                [COLOR="Navy"][SIZE="6"]إنا لله وإنا إليه راجعون
                ولا تحسبن الذين قتلوا في سبيل الله أمواتا بل أحياء عند ربهم يرزقون [/SIZE][/COLOR]

                Comment


                • [COLOR="Navy"][SIZE="6"]إنا لله وإنا إليه راجعون
                  ولا تحسبن الذين قتلوا في سبيل الله أمواتا بل أحياء عند ربهم يرزقون [/SIZE][/COLOR]

                  Comment


                  • حلو قوي الكلام ده

                    بس ليه بيفك كل حاجة حتة حتة

                    مثلا مفيش داعي للفك ده كلو لتركيب الكلاكس

                    أو حتى الزنون انا ركبتو و زي اللي في الصور بس من غير ما فك النور كلو عشان هتتغير عيارات النور.

                    بس تفتح الغطا و تحفرو و تركب الزينون بكل بساطة و تثبت المحول جنب النور مش تحتو شكل الراجل ده هواية بالفك

                    تحياتي..
                    [SIGPIC][/SIGPIC]

                    Comment


                    • This image has been resized. Click this bar to view the full image.

                      On your Koup at this angle it looks like the chin sits lower than the sides. Maybe I'm wrong and it's just the angle the shot was taken.


                      This image has been resized. Click this bar to view the full image.
                      [COLOR="Navy"][SIZE="6"]إنا لله وإنا إليه راجعون
                      ولا تحسبن الذين قتلوا في سبيل الله أمواتا بل أحياء عند ربهم يرزقون [/SIZE][/COLOR]

                      Comment


                      • Click this bar to view the full image.

                        Click this bar to view the full image.

                        This image has been resized. Click this bar to view the full image.

                        This image has been resized. Click this bar to view the full image.

                        This image has been resized. Click this bar to view the full image.

                        This image has been resized. Click this bar to view the full image.

                        This image has been resized. Click this bar to view the full image. __________________
                        [COLOR="Navy"][SIZE="6"]إنا لله وإنا إليه راجعون
                        ولا تحسبن الذين قتلوا في سبيل الله أمواتا بل أحياء عند ربهم يرزقون [/SIZE][/COLOR]

                        Comment


                        • المشاركة الأصلية كتبت بواسطة tamer86 مشاهدة المشاركة
                          حلو قوي الكلام ده

                          بس ليه بيفك كل حاجة حتة حتة

                          مثلا مفيش داعي للفك ده كلو لتركيب الكلاكس

                          1-هو استخدم 20amp fuse للامان اكتر
                          2- لازم يفك كل ده علشان يوصل للكلكس القديم و يركب واحد جديد
                          3- لزق مكان الفانوس و فكه علشان ممكن يتخبط او يتخربش و هو شغال زيادة حرص.
                          4- علشان الفنش يطلع حلو عمل كل السلوك جوا انابيب بلاستيك لزوم النضافه و كمان فك كل الاجزاء عشان السلوك تمشى من تحتها و متبنش لما تفتح الكبوت و كمان متتقطعش لما تغسل الموتور يعنى بيحميها كمان.
                          اتمنى انى اكون فهمت صح و نقلتلك المعلومه صح و لو انت شايف حاجه تانيه ياريت تصححلى


                          أو حتى الزنون انا ركبتو و زي اللي في الصور بس من غير ما فك النور كلو عشان هتتغير عيارات النور.

                          يا باشا الراجل ده بيحب الفنش التمام
                          1-ركب وحده الزينون بلزقه دبل فاس (و حاجه تانيه كمان )وحده على قربة رشاشات المساحات و التانيه على المدفع الحديد (الشاسيه)
                          غشان ميبانوش لما تفتح الكبوت .
                          2-مكان مركب وحدة الزينون دى تحت الكشافات و كان لازم يفكهم عشان يلزق تحتهم .
                          3- كده شكل الكبوت افضل و كمان احسن من حيث الامان من حيث تبريد درجة حرارة الوحدة


                          بس تفتح الغطا و تحفرو و تركب الزينون بكل بساطة و تثبت المحول جنب النور مش تحتو شكل الراجل ده هواية بالفك

                          تحياتي..
                          كلامك صح بس دى الطريقه السهله و صدقنى الطريقه بتاعته احسن
                          1- اشيك و الوحدات مش باينه خالص
                          2 محقرش فى حاجه و لا بوظ و لا لعب و يوم لما يزهك منهم هيشيل اللزق الدبل فاس و خلاص
                          3-اسلوب الحفر و التركيب اللى حضرتك بتقول عليه (مع الوقت و المطبات و الغسيل ممكن(يفك شويه و يعملك صوت يروشك و انت ماشى و متبقاش عارف الصوت جاى منين.على نقيض الاخر.


                          ارجوا ان تتقبل راى الصريح الموضوعى (واعزرنى لجهلى ,انا و الله بحاول افهم و اتعلم من الناس كلها)و ربنا يديم المعروف.
                          و السلام ختام
                          [COLOR="Navy"][SIZE="6"]إنا لله وإنا إليه راجعون
                          ولا تحسبن الذين قتلوا في سبيل الله أمواتا بل أحياء عند ربهم يرزقون [/SIZE][/COLOR]

                          Comment


                          • المشاركة الأصلية كتبت بواسطة tamer86 مشاهدة المشاركة
                            حلو قوي الكلام ده

                            بس ليه بيفك كل حاجة حتة حتة

                            مثلا مفيش داعي للفك ده كلو لتركيب الكلاكس

                            أو حتى الزنون انا ركبتو و زي اللي في الصور بس من غير ما فك النور كلو عشان هتتغير عيارات النور.

                            بس تفتح الغطا و تحفرو و تركب الزينون بكل بساطة و تثبت المحول جنب النور مش تحتو شكل الراجل ده هواية بالفك

                            تحياتي..
                            اشكرك على مدخلتك يا تامر و منور الموضوع و اهلا بيك فى موسوعة كيداهم.
                            [COLOR="Navy"][SIZE="6"]إنا لله وإنا إليه راجعون
                            ولا تحسبن الذين قتلوا في سبيل الله أمواتا بل أحياء عند ربهم يرزقون [/SIZE][/COLOR]

                            Comment


                            • المشاركة الأصلية كتبت بواسطة moha4tec مشاهدة المشاركة
                              كلامك صح بس دى الطريقه السهله و صدقنى الطريقه بتاعته احسن
                              1- اشيك و الوحدات مش باينه خالص
                              2 محقرش فى حاجه و لا بوظ و لا لعب و يوم لما يزهك منهم هيشيل اللزق الدبل فاس و خلاص
                              3-اسلوب الحفر و التركيب اللى حضرتك بتقول عليه (مع الوقت و المطبات و الغسيل ممكن(يفك شويه و يعملك صوت يروشك و انت ماشى و متبقاش عارف الصوت جاى منين.على نقيض الاخر.


                              ارجوا ان تتقبل راى الصريح الموضوعى (واعزرنى لجهلى ,انا و الله بحاول افهم و اتعلم من الناس كلها)و ربنا يديم المعروف.
                              و السلام ختام
                              هو الاصول زي ما حضرتك قلت

                              لكن انا مش من مشجعي الفك من غير داعي بس كده.

                              يعني مش هفك النور مثلا عشان اخبي الاسلاك بس؟!!!

                              و كمان الكلاكس ممكن ما يفكوش بس يقطع السلك بتاعو و خليه مكانه عشان ما فكش بوز العربية كله

                              و سيب الفك للحاجات الضرورية بقى

                              تقبل مروري و موضوعك جامد و فتح عينينا على حاجات كتيرة انا هابتدي اركب فيها واحدة واحدة

                              تحياتي ليك..
                              [SIGPIC][/SIGPIC]

                              Comment


                              • المشاركة الأصلية كتبت بواسطة tamer86 مشاهدة المشاركة
                                هو الاصول زي ما حضرتك قلت

                                لكن انا مش من مشجعي الفك من غير داعي بس كده.

                                يعني مش هفك النور مثلا عشان اخبي الاسلاك بس؟!!!

                                و كمان الكلاكس ممكن ما يفكوش بس يقطع السلك بتاعو و خليه مكانه عشان ما فكش بوز العربية كله

                                و سيب الفك للحاجات الضرورية بقى

                                تقبل مروري و موضوعك جامد و فتح عينينا على حاجات كتيرة انا هابتدي اركب فيها واحدة واحدة

                                تحياتي ليك..

                                ياباشا منور الموضوع و انا شايف الرايين صح .
                                و اتمنى انى اكون افدت الناس كلها و اولهم حضرتك بس يا ريت تكون قرات الموضوع كله.
                                و السلام ختام.
                                [COLOR="Navy"][SIZE="6"]إنا لله وإنا إليه راجعون
                                ولا تحسبن الذين قتلوا في سبيل الله أمواتا بل أحياء عند ربهم يرزقون [/SIZE][/COLOR]

                                Comment

                                Working...
                                X